
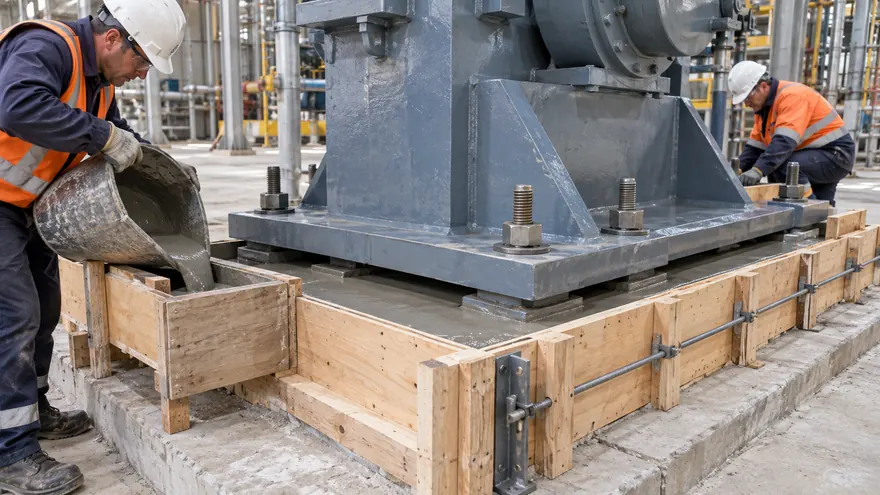
Non-shrink grout installation is not simply a matter of adding water and pouring a bagged product beneath a baseplate. The finished support depends on the entire process: selecting the correct material, preparing the substrate, controlling water and temperature, maintaining a continuous flow, and curing the exposed grout correctly. A mistake at any one of these stages can create voids, weak zones, cracking, or incomplete bearing.
The following precautions apply mainly to packaged cementitious non-shrink grout used beneath machinery, steel baseplates, and similar confined bearing areas. They are a planning guide, not a substitute for the approved project specification, method statement, safety data sheet, or the product manufacturer’s current instructions.
Why Non-Shrink Grout Installation Requires Tight Control
Packaged hydraulic-cement non-shrink grout is intended for load-supporting applications in which a reduction below the initial placement height must be avoided. That is the scope described by ASTM C1107/C1107M-26. For equipment foundations, ACI SPEC-351.4-24 establishes minimum requirements covering materials, placing, and quality control.
These standards define performance and installation requirements, but they do not turn every grout into the same product. Water demand, application thickness, working time, temperature limits, aggregate extension, and curing instructions can vary. Therefore, the approved data sheet for the exact product and lot used on site must remain the primary installation reference.
If you are still comparing grout types or applications, review our non-shrink grouting material engineering guide before preparing the method statement.
12 Essential Non-Shrink Grout Installation Precautions
1. Confirm the Product Before It Reaches the Mixer
Check that the grout is approved for the required gap, load, exposure, placement method, and strength age. Do not select a material from its 28-day compressive strength alone. Flow retention, early strength, bleeding resistance, volume stability, temperature range, and permitted lift thickness may be equally important.
Verify the product name, batch numbers, manufacturing or expiry information, and bag condition. Keep the latest product data sheet and safety data sheet at the work area. If the specification requires a grout compliant with ASTM C1107/C1107M, confirm the relevant declaration rather than assuming that every high-strength cementitious material qualifies.
2. Store Bags Dry and Plan Enough Material for a Continuous Pour
Moisture-damaged powder may contain hard lumps or may have begun to hydrate. Keep unopened bags dry, protected from rain and ground moisture, and within the manufacturer’s stated storage conditions. Do not use torn, wet, hardened, or expired material without written acceptance.
Calculate the theoretical grout volume from the actual void geometry, then add a sensible allowance for surface profile, formwork, mixer residue, and waste. Confirm the yield per bag at the selected consistency. A pour interrupted because the crew runs out of material can create a cold joint beneath the baseplate.
3. Complete a Pre-Pour Plan
Agree on the mixing sequence, batch size, water measurement, delivery route, placement side, vent locations, backup equipment, curing method, and inspection points before opening the first bag. The plan should also define who can stop the pour if the grout loses flow, the formwork leaks, or site conditions move outside the approved limits.
For large or critical baseplates, carry out a trial with the proposed mixer and crew. Confirm that each batch can be mixed, transported, and placed within the documented working time while the pour remains continuous.
4. Control Cement Dust and Wet-Grout Exposure
Cementitious grout is an industrial material, not a harmless powder. The U.S. Occupational Safety and Health Administration warns that wet Portland-cement products can cause caustic burns and dermatitis; dry dust can also affect the eyes and respiratory tract. Complete a site-specific hazard assessment and follow the current safety data sheet.
Wear the required eye, skin, foot, and respiratory protection. Use dust-controlled bag handling and mixing practices. Provide clean washing facilities, and remove contaminated clothing promptly. Never kneel in wet grout or allow it to remain trapped inside gloves or boots.
5. Prepare Concrete and Steel Thoroughly
Remove laitance, weak concrete, dust, oil, grease, curing compounds, paint, and other bond-inhibiting material. The concrete must be sound and have the surface texture required by the project documents or product manufacturer. Clean the underside of the baseplate where bond or intimate contact is required, and degrease anchor bolts where specified.
Preparation must also expose the real geometry of the pour. Check clearances, anchor pockets, shims, leveling screws, grout holes, and possible air traps. Grout should not be expected to correct a baseplate or foundation detail that is structurally or geometrically unsuitable.

6. Pre-Wet to the Required Condition—Without Leaving Puddles
Many cementitious grouts require the concrete to be brought to a saturated surface-dry condition before placement. This reduces water loss from fresh grout into a dry, absorptive substrate while avoiding dilution by standing water. Follow the approved product instructions for the required saturation period and final surface condition.
As a product-specific example, the SikaGrout-328 data sheet requires a clean, sound, roughened substrate in saturated surface-dry condition and states that no standing water should remain. The same document also shows why values must not be generalized: it specifies its own water ranges, thickness limits, temperature conditions, mixing time, and curing procedure for that product.
7. Use Rigid, Leak-Tight Formwork and Provide an Air-Exit Path
Fluid grout can escape through very small gaps. Brace forms against grout pressure and seal joints, corners, bolt penetrations, and the interface with the foundation. If a release agent is used, keep it away from concrete and steel surfaces that must bond to the grout.
Provide enough height on the placement side to maintain a steady head of grout. Allow air and displaced grout to exit on the opposite side. Before mixing, confirm that vents are open and that the intended flow path does not contain a dead end. Keep exposed grout shoulders only where the approved detail requires them.
8. Measure Water for Every Batch
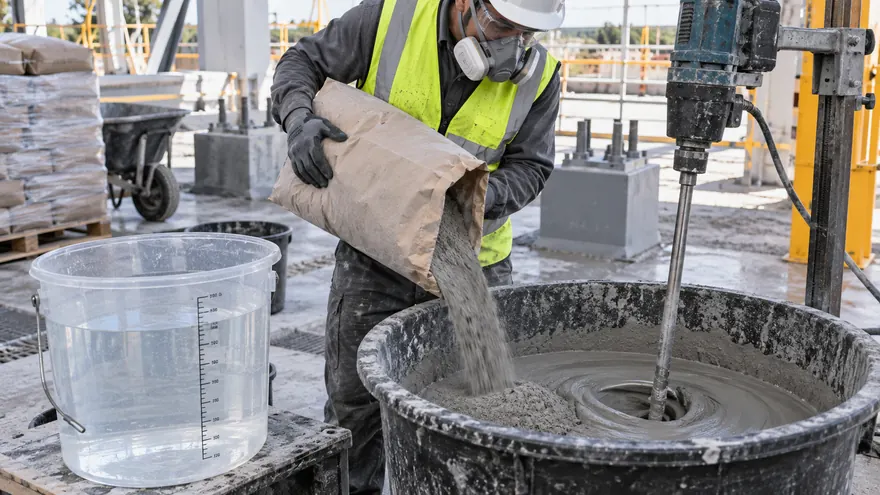
Use clean water and the exact quantity permitted for the required consistency. Calibrated containers or a controlled water-dosing system are more reliable than estimating by eye. Keep the water content and batch size consistent throughout the pour.
Extra water may temporarily improve apparent flow, but it can change segregation resistance, strength, volume stability, and hardened porosity. Do not exceed the data-sheet range. Do not add water later to restore the workability of grout that has begun to stiffen unless the manufacturer explicitly allows that procedure.
9. Mix With the Correct Equipment and Sequence
Use a clean mechanical mixer that can produce a homogeneous batch without excessive air entrainment. Follow the manufacturer’s order of addition, speed, and mixing time. Prepare a new batch only when the crew can place it within the stated working time.
Do not assume that longer mixing is better. Excessive high-speed mixing can introduce air or increase heat, while inadequate mixing can leave lumps and inconsistent flow. If aggregate extension is permitted for a deep pour, use only the type, grading, moisture condition, and dosage approved for that grout.
10. Place Continuously From One Side
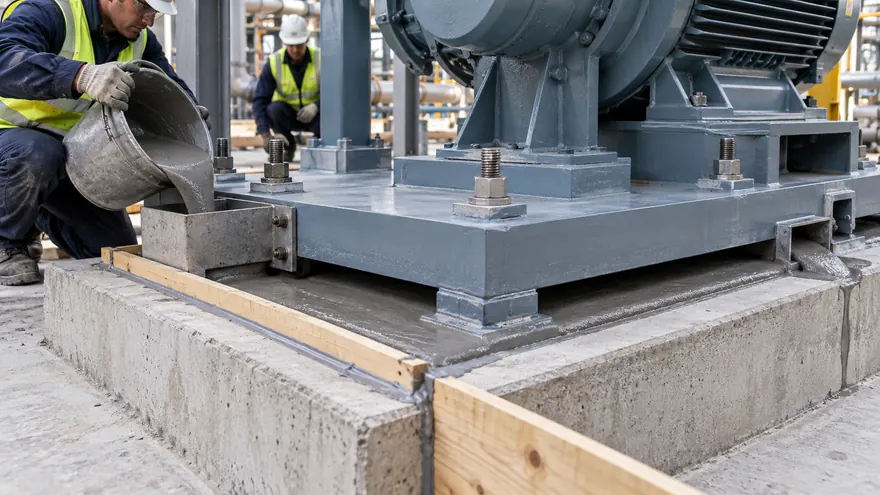
Introduce the grout from one side so that a single advancing front pushes air toward the outlet or vent. Maintain a steady head and continuous material supply until sound grout reaches the opposite side. Pouring independently from several sides can trap air where the flow fronts meet.
Use pumps, straps, rodding, or controlled vibration only when the approved procedure and product instructions permit them. Never use uncontrolled vibration as a substitute for suitable flow or well-designed access. Watch continuously for leaks, form movement, blocked vents, segregation, and loss of head.
11. Protect and Cure the Grout Immediately
Exposed cementitious grout can lose moisture rapidly in heat, wind, or low humidity. Start the specified curing method as soon as the surface condition permits. Protect the installation from rain, freezing, vibration, impact, and rapid temperature change during the early curing period.
The required method and duration are product-specific. For example, Sika’s published instructions for SikaGrout-328 call for wet curing for at least three days or the use of a curing compound meeting ASTM C309 on exposed surfaces. Do not transfer that exact duration to another product without checking its data sheet and the project specification.
12. Do Not Load or Start Equipment Too Early
Elapsed time alone does not prove that the grout can carry the service load. Temperature, consistency, curing, geometry, and batch quality all affect strength development. Tighten anchors, remove temporary supports, align equipment, or start machinery only after the acceptance criteria in the approved procedure have been met.
Record material batches, water per batch, mixing and placement times, ambient and substrate conditions, flow or consistency checks, curing start, and test specimens where required. This information provides traceability and helps the engineer evaluate any later concern.
Pre-Pour Hold-Point Checklist
| Hold Point | What to Verify | Stop the Pour If… |
|---|---|---|
| Documents | Approved product, method statement, data sheet, SDS, and inspection plan are available | The product or procedure is unapproved |
| Materials | Bags are dry, in date, and sufficient for the full pour | Bags are wet, hard, damaged, or insufficient |
| Substrate | Concrete and steel are clean, sound, and prepared as specified | Dust, oil, laitance, debris, or standing water remains |
| Formwork | Forms are rigid, sealed, braced, and provide head and venting | Leakage, movement, or trapped-air geometry is evident |
| Equipment | Mixer, water measure, delivery tools, backup equipment, and curing materials are ready | Critical equipment is missing or unreliable |
| Conditions | Material, substrate, and ambient temperatures are within approved limits | Conditions fall outside the product or project limits |
| Crew | Roles, sequence, communication, PPE, and stop-work authority are clear | The crew cannot maintain a safe continuous pour |
Common Mistakes and Their Likely Consequences
| Mistake | Likely Consequence |
|---|---|
| Choosing by compressive strength alone | Poor flow, inadequate working time, or unsuitable application thickness |
| Adding unmeasured extra water | Variable consistency, segregation, lower strength, or dimensional instability |
| Pouring from opposite sides | Trapped air and incomplete bearing beneath the plate |
| Using weak or leaking forms | Loss of head, honeycombing, inconsistent grout level, or a stopped pour |
| Leaving standing water on the substrate | Local dilution and a weaker interface |
| Delaying curing | Surface drying, cracking, or reduced near-surface quality |
| Loading by time rather than acceptance criteria | Damage before the required in-place strength is reached |
If the planned work is a repair rather than a confined bearing application, compare non-shrink grout and concrete repair mortar before choosing the material.
Frequently Asked Questions
Can I Add More Water If the Grout Does Not Flow Far Enough?
Do not exceed the product’s stated water range. First check material temperature, mixing sequence, mixing time, working time, flow distance, and whether the selected grout and consistency suit the geometry. If adequate placement cannot be achieved within the approved procedure, stop and obtain technical guidance.
Should Cementitious Non-Shrink Grout Be Poured From One Side or Several Sides?
For a typical baseplate pour, one-side continuous placement is used to maintain a single flow front and drive air toward the outlet. The final method must still follow the approved installation detail, especially for unusual geometries or pumped placements.
Must the Concrete Always Be Saturated Surface-Dry?
Many cementitious grouts require saturated surface-dry concrete, but the product instructions control. Saturation time and final surface condition vary. Remove standing water unless the approved manufacturer instructions explicitly state otherwise.
How Long Should Non-Shrink Grout Cure Before Loading?
There is no universal waiting period. Loading depends on the specified strength, actual curing temperature, product performance, test results, and the engineer’s or equipment supplier’s acceptance criteria. Confirm the required strength rather than relying only on hours or days.
Can Non-Shrink Grout Be Used for Any Concrete Repair?
No. Flowable grout is primarily suited to confined voids and bearing areas. Vertical, overhead, feather-edge, or unconfined repairs may require a purpose-designed repair mortar. Confirm the geometry and exposure before selection.
Conclusion
Reliable non-shrink grout installation comes from process control, not from adding extra water or depending on high compressive strength to overcome poor workmanship. Verify the material, prepare the substrate, seal and brace the forms, measure every batch, place continuously from one side, cure promptly, and wait for documented acceptance before loading.
For equipment foundations, precast connections, or other engineered grouting work, review the published data for QD60 grouting material and the wider Qiandao Materials product range. Project requirements vary, so send the gap dimensions, required strength age, placement method, temperature range, and order quantity through our contact page for a project-specific product discussion.
References
- ASTM International. C1107/C1107M-26, Standard Specification for Packaged Dry, Hydraulic-Cement Grout (Nonshrink). Current standards listing accessed September 17, 2026.
- American Concrete Institute. ACI SPEC-351.4-24, Cementitious Grout Installation between Foundations and Equipment Bases—Specification. First printing, November 2024.
- Sika Corporation. SikaGrout-328 Product Data Sheet. Product-specific guidance for surface preparation, forming, mixing, application, and curing; accessed September 17, 2026.
- Occupational Safety and Health Administration. Concrete and Concrete Products—Controlling Hazards. Guidance on wet Portland-cement skin hazards and PPE; accessed September 17, 2026.