
Non-shrink grout is a factory-blended hydraulic-cement material designed to fill a confined gap without dropping below its initial placement height under the specified test conditions. It creates continuous contact between a base plate and its foundation. Therefore, it can transfer loads more uniformly than spot bearing on shims or an uneven concrete surface.
That definition matters. “Non-shrink” does not mean that the grout can never change dimension in every environment. It describes controlled volume change measured by defined laboratory methods. Product selection, water control, surface preparation, placement and curing still determine field performance.
Quick answer: For reliable precision grouting, specify the required standard and service conditions. Then use the exact water dose in the product data sheet, prepare sound saturated-surface-dry concrete, place continuously from one side, and cure immediately. Do not select grout by 28-day compressive strength alone.
What is non-shrink grout?
Packaged non-shrink cementitious grout normally contains hydraulic cement, graded fine aggregate and performance additives. The installer adds only a measured quantity of clean water. Some products use gas-forming or expansive components to offset plastic settlement and later contraction.
ASTM C1107/C1107M-20 covers packaged dry hydraulic-cement grout intended for use under applied load where a reduction below the initial placement height must be avoided. It applies to factory-made materials that require only mixing water.
The grout fills irregularities beneath steel or precast elements. As a result, the supported item gains a larger effective bearing area. ACI PRC-351.1-12, reapproved in 2024, explains that stable volume and complete, permanent filling are central to load-transfer performance.
Non-shrink grout is not ordinary mortar
Site-batched sand-and-cement mortar may lose volume through settlement, bleeding or drying. It also lacks verified flow and height-change performance. In contrast, compliant non-shrink grout is pre-engineered and tested as a complete system.
Likewise, cementitious grout and epoxy grout are not interchangeable. Cementitious grout is often economical, compatible with concrete and suitable for many static equipment or column bases. Epoxy grout may be preferable for severe chemical exposure, high impact, sustained vibration or special thermal conditions. The engineer should make that choice from the actual loads and environment.
Where is non-shrink grout used?
Common applications include:
- Machinery, pump, compressor and generator base plates
- Structural steel column base plates
- Bridge bearing seats, where the project specification permits
- Precast concrete joints and bearing zones
- Anchor bolts, dowels, recesses and prepared cavities
- Crane rails and other aligned steelwork
However, one approval does not cover every use. For example, EN 1504-6 addresses products used to anchor reinforcing steel for structural strengthening. It is not a universal machinery-base grouting standard. Always match the declared standard to the application.
How to select the right non-shrink grout
Start with the load case, geometry and environment. Then compare current technical data sheets using the same test methods and test temperatures.
| Selection factor | What to confirm | Why it matters |
|---|---|---|
| Compliance | ASTM C1107/C1107M, project specification, or the applicable regional standard | “Non-shrink” should be supported by a declared test basis. |
| Consistency | Fluid, flowable, plastic or dry-pack range | The grout must reach the full cavity without segregation. |
| Strength development | Required strength at loading time and at 28 days | Early strength controls return to service; later strength alone may not. |
| Volume change | Plastic and hardened height-change results | Stable contact is essential for load transfer. |
| Placement thickness | Minimum and maximum lift in the current data sheet | Excessive depth can raise heat and cracking risk. Thin gaps may restrict flow. |
| Working time | At the expected material and site temperature | Hot grout can stiffen quickly. Cold grout develops strength slowly. |
| Aggregate extension | Whether the manufacturer permits clean graded aggregate | Deep placements may need a special procedure or a different product. |
| Exposure | Water, freeze–thaw, chemicals, vibration and service temperature | Exposure can govern binder type and protection. |
Treat published strength as product-specific data
There is no single compressive-strength value for all non-shrink grout. For context, one general-purpose ASTM C1107 product publishes about 25 MPa at one day and 65 MPa at 28 days in a flowable consistency. Another publishes 26 MPa and 56 MPa at the same ages and states a 23°C test condition. These figures show a realistic order of magnitude, not a universal acceptance limit.
Test method, consistency, water content, curing and specimen geometry affect the result. Therefore, do not compare cube values with cylinder values as if they were equivalent. The project engineer should define the required test method and the minimum strength before equipment loading.
Standards and tests that matter
For equipment-base work in North America, ACI SPEC-351.4-24 provides minimum requirements for materials, placement and quality control. ASTM C1107/C1107M is the main packaged non-shrink grout specification referenced by many projects.
The following tests answer different questions:
- Consistency or flow: confirms that the mixed grout matches the specified placement condition.
- Early height change: ASTM C827/C827M-23 evaluates height change from placement until the mixture becomes hard.
- Hardened height change: ASTM C1090/C1090M-23 evaluates protected grout cylinders over a stipulated 28-day period. It does not measure pre-hardening change.
- Compressive strength: confirms strength at specified ages using the stated specimen and curing method.
- Yield: checks whether a bag produces the declared volume at the approved water content.
Because each method measures a different property, a strong grout can still be unsuitable if it bleeds, shrinks, segregates or cannot fill the cavity.
How to calculate the required grout quantity
Use the net cavity volume, then add an allowance for formwork, waste and normal site losses.
Required grout volume (L) = length (m) × width (m) × depth (m) × 1,000
Bags required = required volume × waste factor ÷ declared yield per bag
Worked example
A base plate cavity measures 1.0 m × 1.0 m × 0.05 m.
- Net volume = 1.0 × 1.0 × 0.05 × 1,000 = 50 L
- Add 10% for waste and formwork = 50 × 1.10 = 55 L
- If the current data sheet declares 13 L per bag, bags required = 55 ÷ 13 = 4.23
- Round up: order at least 5 bags, plus any project contingency.
Use the actual yield on the selected product’s latest data sheet. Do not calculate from bag mass alone.
Surface preparation before grouting
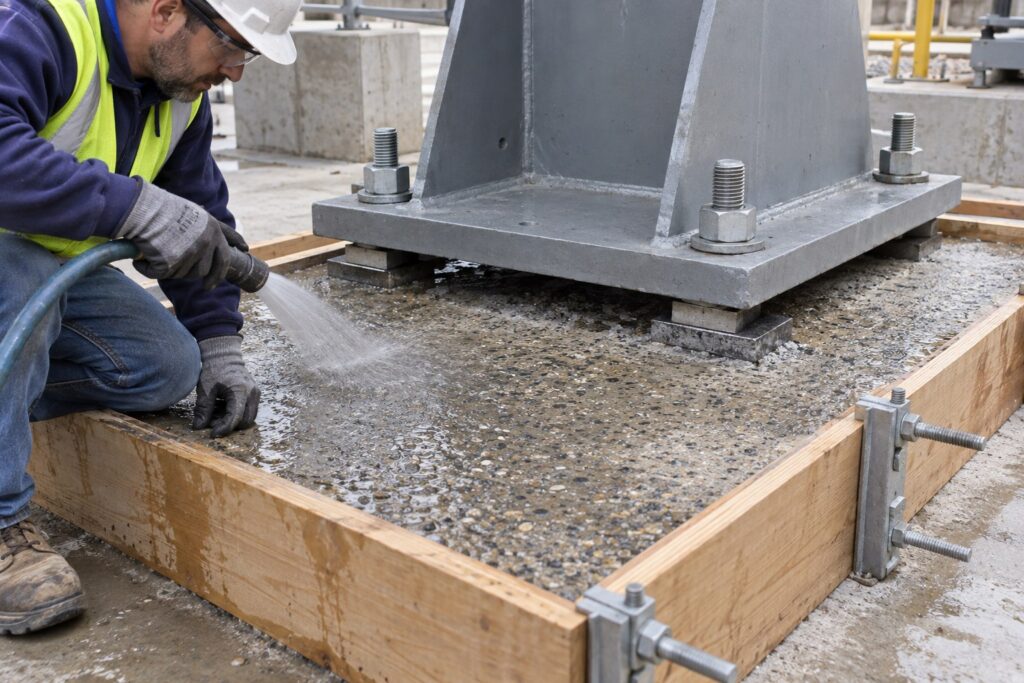
Good preparation gives the grout a sound, clean interface and prevents the dry foundation from pulling mixing water out of the grout.
- Verify alignment and clearance. Confirm base-plate level, anchor-bolt position, gap depth and access before building forms.
- Remove weak concrete. Eliminate laitance, curing compounds, oil, paint and loose material. Mechanically roughen the surface to expose sound aggregate where the specification requires it.
- Clean the interfaces. Remove dust and debris. Also clean the underside of the base plate.
- Pre-soak the concrete. Bring cementitious-grout substrates to saturated-surface-dry, or SSD, condition unless the product data sheet states otherwise.
- Remove free water. SSD concrete is damp but has no standing water. Puddles can dilute the grout at the bond line.
- Build rigid, leak-tight forms. Brace them against grout pressure. Seal joints without blocking the grout path.
- Create a headbox and outlet. A higher form on the placing side maintains pressure. The opposite side needs a clear outlet for air and grout.
Dry concrete, leaking forms and trapped debris cause many avoidable failures. Therefore, complete a signed pre-pour inspection before mixing begins.
How to mix non-shrink grout correctly
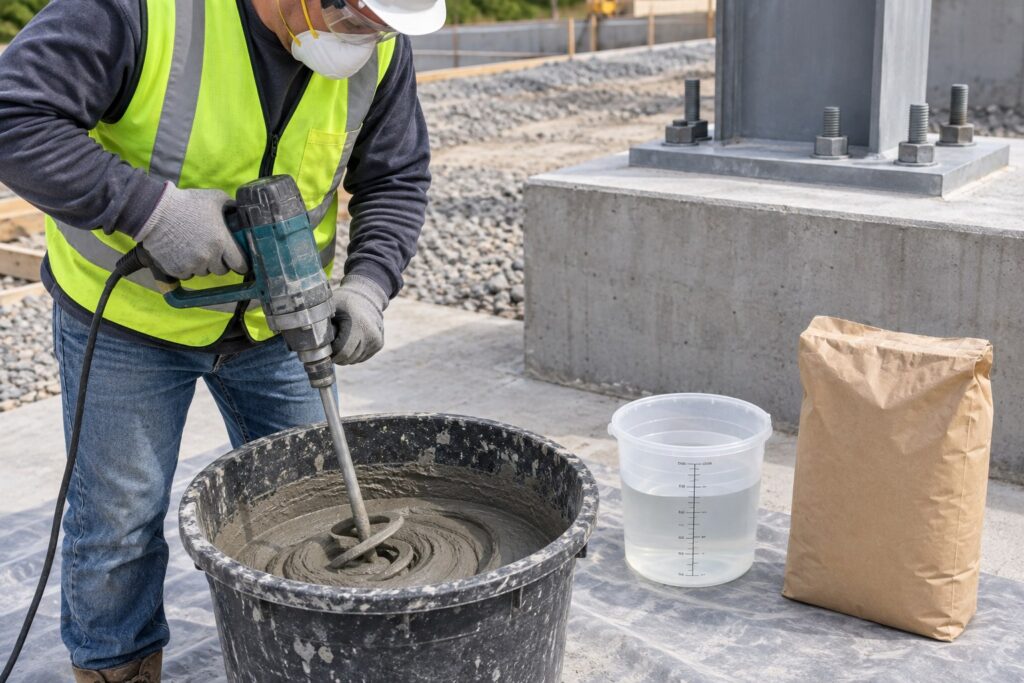
Water control is the most important mixing variable. Extra water may improve apparent flow for a few minutes. However, it can reduce strength, increase bleeding and change dimensional performance.
- Check the product name, batch number, shelf life and bag condition.
- Condition materials within the temperature range stated in the data sheet.
- Measure clean potable water for each whole bag. Never estimate with an unmarked bucket.
- Use a clean, pre-dampened grout mixer or heavy-duty drill with the correct paddle.
- Follow the manufacturer’s addition sequence. Commonly, measured water enters first and powder is added gradually while mixing.
- Mix for the stated time until the grout is uniform and lump-free. Avoid high speed that entrains air.
- Use only the permitted water range to reach the specified consistency. Never exceed the maximum.
- Place the batch within its stated working time. Do not retemper stiffened grout with water.
For larger pours, use a high-shear colloidal or dedicated grout mixer if the product and method statement require one. Plan batch size and labor so that placement remains continuous.
Place non-shrink grout from one side
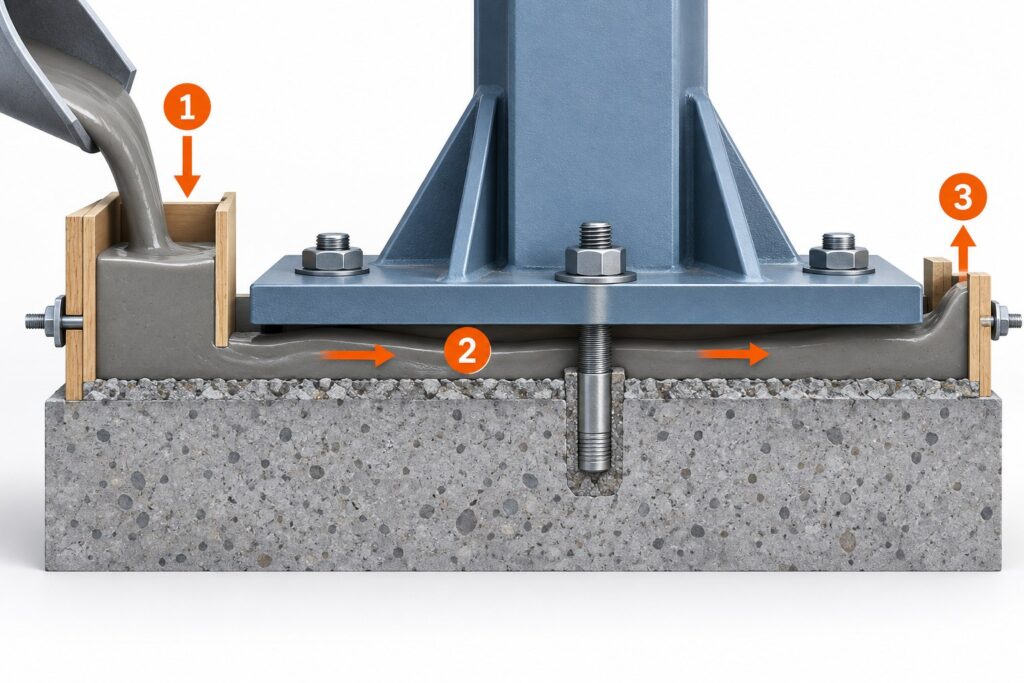
Place grout continuously from one side toward the outlet. This method pushes air ahead of the advancing grout front. Pouring from opposite sides can trap an air pocket beneath the base plate.
Maintain enough head to keep the grout moving, but do not create turbulence. Keep the outlet visible until uniform, uncontaminated grout emerges. Pumps, headboxes, straps or other aids must follow the approved method statement and product instructions.
Do not use a concrete vibrator unless the grout manufacturer expressly permits it. Vibration can segregate a highly flowable grout. Likewise, avoid interrupting the pour, because a cold joint can prevent full bearing.
Finish and cure without delay
Protect exposed shoulders from rapid moisture loss, direct sun, wind, rain, frost and thermal shock. Start the specified curing method as soon as finishing and product instructions allow. Wet curing, wet coverings or a compatible curing compound may be used, depending on the system.
Do not load the base when the surface merely looks hard. Instead, release equipment or structural loads only after the grout reaches the engineer’s required strength and any other acceptance criteria.
Quality-control checklist
Record field data for every pour. A concise grout log should include:
- Product name, lot numbers, bag count and expiry dates
- Water added to each batch and total water used
- Ambient, substrate, water and grout temperatures
- Start time, mix time, placement time and completion time
- Measured flow or consistency using the specified method
- Actual yield or placed volume, when required
- Strength specimen IDs, curing conditions and test ages
- Photos of substrate, formwork, mixing, grout emergence and curing
- Weather protection, curing method and loading authorization
Compare results only with the acceptance criteria in the approved submittal. If water, temperature or flow falls outside the limit, stop and obtain a documented disposition. Do not hide a nonconformance by adding cement, powder or water on site.
Common non-shrink grout failures and their causes
| Symptom | Likely causes | Preventive action |
|---|---|---|
| Voids beneath the plate | Pouring from two sides, low head, interrupted placement, trapped air | Place continuously from one side and keep the outlet open. |
| Low strength | Excess water, wrong test method, poor curing, cold conditions | Measure water and verify the specified test procedure and loading age. |
| Cracked shoulders | Unrestrained wide shoulder, rapid drying, thermal effects | Follow the detail, limit exposed shoulders and cure immediately. |
| Debonding | Laitance, oil, dust, dry substrate or standing water | Expose sound concrete, clean thoroughly and achieve SSD condition. |
| Segregation or bleeding | Too much water, excessive mixing speed or unapproved vibration | Stay within the data-sheet water range and use suitable equipment. |
| Incomplete filling | Grout too stiff, narrow access, early stiffening or leakage | Confirm geometry, temperature, working time and form tightness before mixing. |
Frequently asked questions
Is non-shrink grout waterproof?
Not automatically. Dense cementitious grout can resist water penetration, but “non-shrink” is a volume-change classification. For water-retaining or submerged work, verify permeability, exposure and crack-control requirements separately.
Can I add extra water to improve flow?
No. Use only the water range stated in the current product data sheet. Excess water can reduce strength and alter bleeding, segregation and height-change behavior.
How thick can non-shrink grout be placed?
The permitted thickness depends on the product, temperature, geometry and whether aggregate extension is approved. Use the selected product’s data sheet and the project specification. Do not apply a generic thickness range to every grout.
When can equipment be loaded?
Load only after the grout reaches the strength specified by the engineer or equipment supplier. Confirm that strength by the approved curing and test method. Elapsed time alone is not enough.
Should non-shrink grout be poured from both sides?
Usually no. For a base plate, continuous placement from one side helps drive air toward the outlet. The approved method statement should define the flow path for unusual geometry.
Does ASTM C1107 compliance make a grout suitable for every project?
No. ASTM C1107 addresses packaged non-shrink hydraulic-cement grout performance. The project must still check strength development, working time, thickness, temperature, exposure, loading and installation requirements.
Final specification advice
Reliable non-shrink grout work is a system, not a bag-strength contest. Specify a recognized standard, define the loading age and test method, and approve a current product data sheet. Then control water, temperature, substrate condition, flow direction and curing in the field.
Finally, require a pre-pour checklist and a grout log. Those two records make the work easier to inspect, trace and improve. They also provide evidence that the installed grout matches the design intent.
Technical note: This article provides general engineering guidance. The project drawings, engineer’s specification, equipment supplier’s requirements and current product data sheet take precedence. A qualified professional should approve the final material and method statement.
References
- ASTM International, ASTM C1107/C1107M-20: Packaged Dry, Hydraulic-Cement Grout (Nonshrink).
- American Concrete Institute, ACI SPEC-351.4-24: Cementitious Grout Installation between Foundations and Equipment Bases.
- American Concrete Institute, ACI PRC-351.1-12: Report on Grouting between Foundations and Bases, reapproved 2024.
- ASTM International, ASTM C827/C827M-23: Early-Age Height Change.
- ASTM International, ASTM C1090/C1090M-23: Hardened Height Change.
- CEN/SIST, EN 1504-6: Anchoring of Reinforcing Steel.